#33 - Assignment Models - Venator Star Destroyer 7
This is the final post for the Venator destroyer explaining how I created to central tower on the back of the ship, and then the final details around the back. I adjusted the size of some of the middle faces on the top of the model using connections, then extruded the resulting faces upwards. I the dragged the vertices on the top corners of the extrusion inwards to match the schematic, and added some extra vertices in the middle to ensure I got exactly the right shape, where it bends slightly. A point I would like to mention early in this post is that the schematics were still not scaled to match each other completely, so from the front view, the tower seems slightly wider than the schematic, as well as from the side view, and the top view is offset by a fair bit. However, I have used my own judgement to balance the size of the tower as accurately as possible, and it has turned out quite well. The shape and size are close enough between the three perspectives that it looks like a standard
Venator class destroyer like the ones on Google images. All of the bends are at the same angle, and the size of the bits on the top are to scale with the rest of the tower. Speaking of which, to create these I used a bezier curve to draw the shape to match that of the side view schematic, and then used the planar tool and the extrude tool to make it 3D. I selected the vertices around the top edge and scaled them inwards slightly to give the whole object a minor arch shape along the top. I then added three details; a hollow cylinder in the middle, simply scaled to size and stuck in the top; extruded bars on the back end; and two extruded squares near the front. These details together made the top bits look more realistic and matched the schematic without adding too many polygons. The remaining details will be done using textures, as they are too thin to be seen on the model anyway.

Once the top bits were done I focused again on the tower. I slightly adjusted the size of the indents on the front, then, using the multi-cut tool cut out the shape of the larger extrusion seen on the model, before extruding it, then did the same for smaller shapes on the new face. I did these shapes because they are just about thick enough to be worth adding to the mesh, but the rest of the details on the tower will be done with textures. Unfortunately, the multi-cut tool would not recognise the symmetry on the model, so I had to do both sides individually, although this tool was still very useful for making the tower seem less bland and untouched. In the image below, you can barely see the difference, so the smaller extrusions would be pointless. Obviously, once the textures are added it will be refreshed. I also added a new cube primitive and scaled it to the size of the shape on the back of the tower, connecting it to the bit that runs between the engines. I added divisions on the top face and moved the vertices to form the shape to match the schematic, then used the combine tool to add it to the main ship object. I also quickly added another cube, scaled to match the schematic again, and put it between the engines. This was the bit that I forgot to add in with the engines, but it does not have many details on it anyway. I duplicated the first one and moved it opposite. These will be textured along with the rest of the back.

I did have to use my own judgement for a lot of the positioning on the back of the ship, and the bottom, but after I'd finished it I did find the following images, and my judgement seems to have matched these schematics quite closely. The bottom of the ship is clearly very flat, and won't be visible at all in the animation, so I will leave it how it is until I texture it. The details on the back are also very flat and won't be seen so I will leave those for texturing as well. Bear in mid the below images were not taken into consideration when actually modelling the ship, and were only used for comparison afterwards.
 |
| http://forums.cgsociety.org/archive/index.php?t-500506.html |
 |
| https://jasonmartin3d.deviantart.com/art/Venator-Star-Destroyer-Bottom-149784200 |
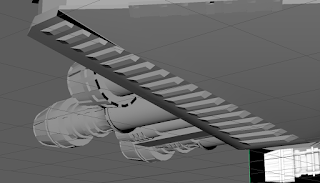
The final part of the ship I created was the shield on the bottom at the back. To do this I simply extruded the faces at the bottom that had not been extruded earlier, and pulled them out slightly further than the rest of the bottom had been. I then selected the central vertex and pulled it forward to create the point moving towards the front of the ship. Using the add divisions tool I added 36 divisions to the face on each side of the ship, then extruded every other face before using the scale tool on each individual face to make it more like a pyramid shape. This was a somewhat time consuming process but I think it was worth it because it looks like the schematic only with more ridges, making it look more powerful. Furthermore, because I pushed the edges on the short side of each face when they were all selected, not all of them went in fully, but this was good because they actually get gradually larger in the schematic, so this mistake improved the shape of the shield significantly.

I think that the creation of the tower went quite well, although admittedly I did get lucky at some points when intending to adjust one area and also improving the shape of another, such as dragging the vertices down where the tower indents at the front, and making the very front section thinner at the same time. This was something I struggled to do earlier because I could not extrude the front faces without leaving other faces sticking out, which I could not delete as they were crucial to the model. Nonetheless, the end shape matches the schematics (at least balanced between them as they are not to scale with each other) and looks right on top of the actual model. I have had to sacrifice a lot of details on the tower, and on some areas of the back of the ship, but I am fully confident that I can justify this because, as I have mentioned before, adding these details would add a lot of polygons and none of them would be visible, both on the model and in the animation, so texturing the details in is the logical thing to do.


Comments
Post a Comment