#15 - Modelling - Modelling Techniques 2
I am now moving on to the week 4 modelling techniques worksheet, which ends with the creation of an F16 jet model. This post will be focusing on the new modelling techniques which I will use to create the F16.
The first exercise was to create a mailbox model using curves. I had a couple of problems with this. Firstly, when I made the shape of the mailbox using the bezier curve tool, it would not add the intersections inside when using the planar tool. I tried to close the gap between the start and end points of the curve using the open/close curve function, and although this closed the gap and allowed the planar tool to work, it left a random line moving past the shape to the left. I tried to delete this after extruding the whole shape, making it 3D, but although the extra faces and edges would delete the original 2D line remained. For now, I'll just have to leave it. I then extruded the inner faces of the new planar back inside the object, making the final mailbox shape (plus a random line at the back).


Looking back, it might have been better to ignore the dent at the top of the model when using the bezier curve tool, as that could have caused it to have a set amount of segments at the top, whereas if I had just had a straight line I could have multi-cut the right sized gaps in a flat top and extruded them down instead.
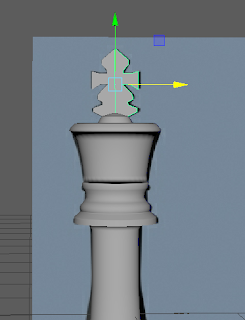
When doing the bishop I encountered the same problem again. When I revolve a curve using polygons, it gives me a really low quality shape, and if I try and increase the polygon count it only gives me a good enough shape if I use a really high number, in this case the maximum 1000. In this case this is fine, but in a project with lots more happening, with things that need rendering, this would be really inefficient. For this reason, I will try to only use the revolve tool for objects that are totally symmetrical. Fortunately, for the slice in the bishop, I was able to use the multi-cut tool with x-ray turned on to cut a bar out of the side of the head of the object, and extrude the appropriate faces into the object, on both sides. What is left of these faces is inside the model and barely visible without looking specifically for them.

Again, I had the same problem with the queen. I just decided to use a standard polygon revolve and accept the low quality, as these models are never going to be used for anything other than practise. As for extruding the top area to get the dented sections right, I just pulled down every other face and it looks close enough. If I were to need this model in the future I will have to spend more time figuring out the best mixture of polygon count and detail, because at the moment I am struggling to be able to extrude faces without it leaving other faces in the way, and I cannot extrude on nurbs objects at all.

Finally, the most difficult piece to model is the knight, as only the very base is symmetrical and the rest is a horse shape. After revolving the base shape, I drew the outline of the horse using the bezier curve tool and instead of revolving it, I used the planar tool to fill in the bezier curve with faces so I could extrude them. This created a 3D horse shape, however it was quite flat. I simply used the smooth tool and this rounded the edges of the whole shape, making it look significantly more like the image very quickly. There is some detail still missing, like the thinner mane at the back of the model, but when I attempted to extrude it inward and use the smooth tool again it just ended up looking cubic, so it is better this way for now.


The first exercise was to create a mailbox model using curves. I had a couple of problems with this. Firstly, when I made the shape of the mailbox using the bezier curve tool, it would not add the intersections inside when using the planar tool. I tried to close the gap between the start and end points of the curve using the open/close curve function, and although this closed the gap and allowed the planar tool to work, it left a random line moving past the shape to the left. I tried to delete this after extruding the whole shape, making it 3D, but although the extra faces and edges would delete the original 2D line remained. For now, I'll just have to leave it. I then extruded the inner faces of the new planar back inside the object, making the final mailbox shape (plus a random line at the back).

The next tool I needed to learn how to use was the revolve tool. I didn't really have any problems with this. I had to use the curve editing tool to properly shape the last bezier curve before closing the curve, but otherwise once I had input the right options it immediately gave me this shape:

I am not sure if the shape is supposed to be black or not, but for now it is not a problem, and I will look into it soon. Update - if you select all of the faces and use the reverse tool it will turn the object back to normal grey, as the way the revolve has worked seems to have left the outside of the object as the inside, sort of inverted. It depends which way the object is revolved, and this is the most effective way of resolving the issue if it revolves the wrong way.
The revolve tool is really useful for turning any bezier curve forming half of a symmetrical shape in 2D into a full 3D shape. It is also useful if most of the object you want to model is 3D, as you can make changes to the 3D object that is formed anyway. For example, the chess pawn pictured below is symmetrical, and the revolve tool turned the 2D bezier curve outlining half of the image of the pawn into a 3D pawn.

I did originally have quite a big problem with using the revolve tool on the pawn. Whenever I tried to revolve it on the Y-axis, it made a huge ring (pictured below), and the X and Z axes did a similar thing in other directions. I tried to move the bezier curve to the middle of the board, thinking that was the pivot point, but it did the same thing only further to the left. I then realised that you can move the pivot point of an object by pressing the D key and dragging it across, so I centered the pivot point of the pawn's bezier curve along the line which would become the center of the model, and then revolving it on the Y-axis worked.

After the issue with revolving the pawn, I moved on to the other five pieces. For the top of the king piece, which is flat, I added a flattened cube in and used the multi-cut tool to cut the shape of the piece out of the cube. I also had the x-ray tool active so I could see the image through the cube. Once the shape was cut, I removed the extra faces from the cube leaving half of the top of the king piece, and then used the mirror tool to reflect the other half. I selected the X-axis and set the geometry type to flip.

Unfortunately, I was unable to completely finish the rook piece because I decided it was not worth the time cost to solve a small problem. The problem is mainly that I cannot create the castle shape at the very top of the model for several reasons. Initially, I was unable to select any faces on the model because they all had purple dots inside and the extrude tool would not work at all. I found out that this was because the object was made of NURBS instead of polygons, so I used the convert nurbs to polygons function to convert the object into a polygon object, and then it would allow me to use the extrude tool. However, it still would not let me simply extrude a face down because it would leave other faces and edges in the way, and when you delete them they still appear but you can't select them, as if it's deleting the entity but not its display. I tried deleting the entire revolved object and revolving it again but with the polygons option ticked, and it would only give me a really low poly version of it, no matter how many different settings I tried. Ultimately, I decided that although it didn't look like the exact rook in the picture, it still looked enough like a rook in general so for now I will leave it how it is.
 |
| This is the rook in NURBS form. |
When doing the bishop I encountered the same problem again. When I revolve a curve using polygons, it gives me a really low quality shape, and if I try and increase the polygon count it only gives me a good enough shape if I use a really high number, in this case the maximum 1000. In this case this is fine, but in a project with lots more happening, with things that need rendering, this would be really inefficient. For this reason, I will try to only use the revolve tool for objects that are totally symmetrical. Fortunately, for the slice in the bishop, I was able to use the multi-cut tool with x-ray turned on to cut a bar out of the side of the head of the object, and extrude the appropriate faces into the object, on both sides. What is left of these faces is inside the model and barely visible without looking specifically for them.

Again, I had the same problem with the queen. I just decided to use a standard polygon revolve and accept the low quality, as these models are never going to be used for anything other than practise. As for extruding the top area to get the dented sections right, I just pulled down every other face and it looks close enough. If I were to need this model in the future I will have to spend more time figuring out the best mixture of polygon count and detail, because at the moment I am struggling to be able to extrude faces without it leaving other faces in the way, and I cannot extrude on nurbs objects at all.

Finally, the most difficult piece to model is the knight, as only the very base is symmetrical and the rest is a horse shape. After revolving the base shape, I drew the outline of the horse using the bezier curve tool and instead of revolving it, I used the planar tool to fill in the bezier curve with faces so I could extrude them. This created a 3D horse shape, however it was quite flat. I simply used the smooth tool and this rounded the edges of the whole shape, making it look significantly more like the image very quickly. There is some detail still missing, like the thinner mane at the back of the model, but when I attempted to extrude it inward and use the smooth tool again it just ended up looking cubic, so it is better this way for now.

Now that I have completed a set of all chess pieces, I have learned that it is crucial to find a reasonable balance between the polygon count and the model quality when using the revolve tool, because using NURBS instead prevents me from being able to use the extrude or multi-cut tools. If the object is totally symmetrical and requires no further editing after the revolve, then using NURBS is probably advantageous, as the object is automatically of a higher quality with less processing power being used, but it is far more difficult to edit it afterwards. Therefore, for the pieces with non-symmetrical areas I had to resort to using polygons. At this stage however, all of the pieces together look like they are of a good quality and could be used in a standard chess game. I also used the smooth tool for the first time and believe it is the most useful tool for creating curved edges, such as the body of the knight piece.


Comments
Post a Comment