#12 - Modelling - Modelling Techniques
It occurred to me recently that I missed out some of the individual tool practise exercises and jumped straight ahead onto the larger tasks such as the house or the derelict town, so in this post I will show how I went back and practised using the tools mentioned in the week 3 worksheet to ensure that I know how to use all of the tools properly, as there are some I have not needed to use so far.
Bridge Tool:
I found this tool very simple to use. To test it, I deleted a face on a cube, the selected to parallel edges and pressed the bridge button, which fixed the gap in the cube. I tried to record this as a video but my software is broken, so I'll leave it for now. There have been a few occasions where I have fixed an unexpected gap in an object using this tool.
Add Division Tool:
To add divisions to my cube I selected edit mesh then add divisions, set it to linear then put 5 into the U axis input box. This was the ideal tool for making windows and doors, as you can easily create sections.

Insert Edge Loop Tool:
This is the first tool on the list that I haven't used before, although I can already see that it will come in very useful for making the F16 plane's body, which will need to be dragged out to different lengths along the cylinder. Whilst accidentally holding shift and clicking I discovered you can actually push out the object from where the new edge is created, which is useful for rounding off the ends of objects.

This one is pretty self-explanatory and I've used it plenty of times before now, so I'll just note that it has the same effect as the connect tool or the insert edge loop tool, the main difference being the situation that you use it in (or the algorithm which is required). For example, the insert loop tool gives you a straight line across a face, whereas the multi-cut tool can give you jagged lines or diagonals. This tool is very useful for being able to freely create your own shapes and outlines, without being restricted by geometry so much as other tools like the connect or insert edge loop tools. It can also be used to place vertices in very specific places, allowing you to pull surfaces out from anywhere you want.
Connect Tool:
As mentioned above, same effect as insert edge loop only on a single flat surface. It is more useful for quickly connecting multiple vertices on a straight line, as I did on my Venator model across the top and bottom.
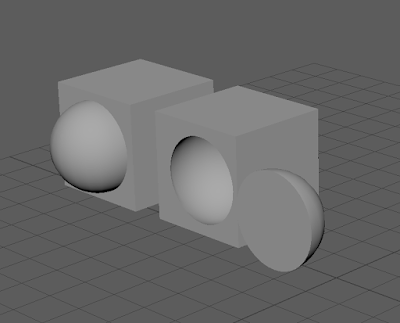
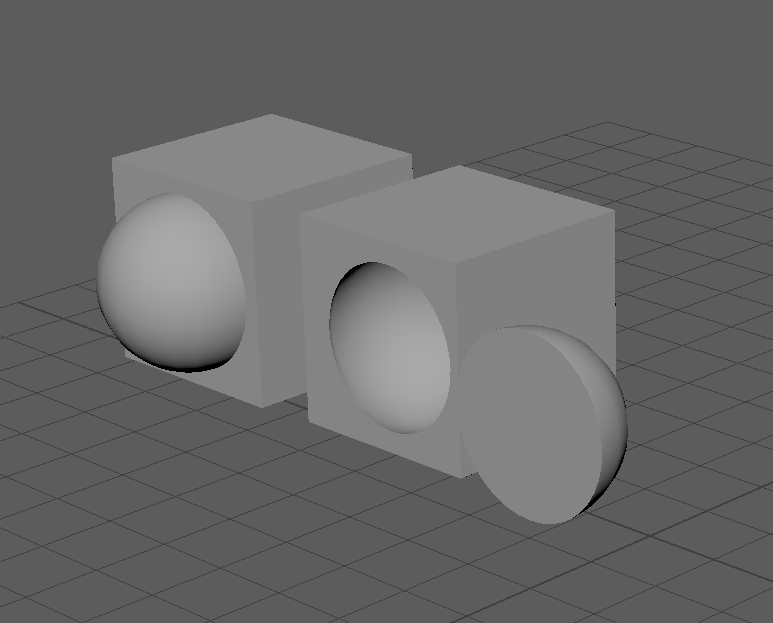
Boolean Operations:
Here I will show the three different types of boolean operation in use: union, difference and intersection.
Union: The two objects are joined together.
Difference: The second selected object disappears and a gap is left where it was inside the first object.
Intersection: The section where the two objects connect is left, and the rest is removed.
So far the difference tool has been the most useful for me. I used it to create the holes for the lasers on the Jedi star fighter, and also to hollow out the house in my derelict town. It is great for being able to make that perfect space in another object without ruining it.
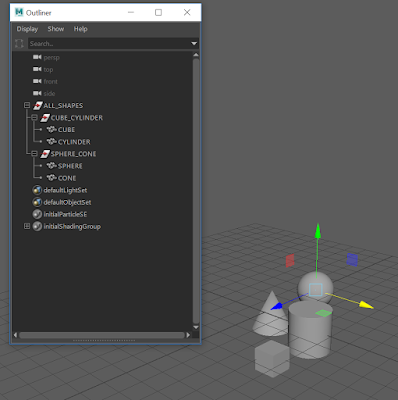
Grouping:
Here I have practised grouping objects together, naming each group element and using the display handle tool. As you can see in the image below, I have grouped the objects according to the exercise on Canvas. If you select un-group on ALL SHAPES it only removes that group, and not the groups inside that group (CUBE_CYLINDER and SPHERE_CONE), rather than all of the groups below the highest group.

This is all of the tools outlined in the week 3 exercises, which I will now apply to the F16 model I will be making.
Bridge Tool:
I found this tool very simple to use. To test it, I deleted a face on a cube, the selected to parallel edges and pressed the bridge button, which fixed the gap in the cube. I tried to record this as a video but my software is broken, so I'll leave it for now. There have been a few occasions where I have fixed an unexpected gap in an object using this tool.
Add Division Tool:
To add divisions to my cube I selected edit mesh then add divisions, set it to linear then put 5 into the U axis input box. This was the ideal tool for making windows and doors, as you can easily create sections.

This is the first tool on the list that I haven't used before, although I can already see that it will come in very useful for making the F16 plane's body, which will need to be dragged out to different lengths along the cylinder. Whilst accidentally holding shift and clicking I discovered you can actually push out the object from where the new edge is created, which is useful for rounding off the ends of objects.

Multi-Cut Tool:
This one is pretty self-explanatory and I've used it plenty of times before now, so I'll just note that it has the same effect as the connect tool or the insert edge loop tool, the main difference being the situation that you use it in (or the algorithm which is required). For example, the insert loop tool gives you a straight line across a face, whereas the multi-cut tool can give you jagged lines or diagonals. This tool is very useful for being able to freely create your own shapes and outlines, without being restricted by geometry so much as other tools like the connect or insert edge loop tools. It can also be used to place vertices in very specific places, allowing you to pull surfaces out from anywhere you want.
Connect Tool:
As mentioned above, same effect as insert edge loop only on a single flat surface. It is more useful for quickly connecting multiple vertices on a straight line, as I did on my Venator model across the top and bottom.
Boolean Operations:
Here I will show the three different types of boolean operation in use: union, difference and intersection.
Union: The two objects are joined together.
Difference: The second selected object disappears and a gap is left where it was inside the first object.
Intersection: The section where the two objects connect is left, and the rest is removed.
So far the difference tool has been the most useful for me. I used it to create the holes for the lasers on the Jedi star fighter, and also to hollow out the house in my derelict town. It is great for being able to make that perfect space in another object without ruining it.
Grouping:
Here I have practised grouping objects together, naming each group element and using the display handle tool. As you can see in the image below, I have grouped the objects according to the exercise on Canvas. If you select un-group on ALL SHAPES it only removes that group, and not the groups inside that group (CUBE_CYLINDER and SPHERE_CONE), rather than all of the groups below the highest group.

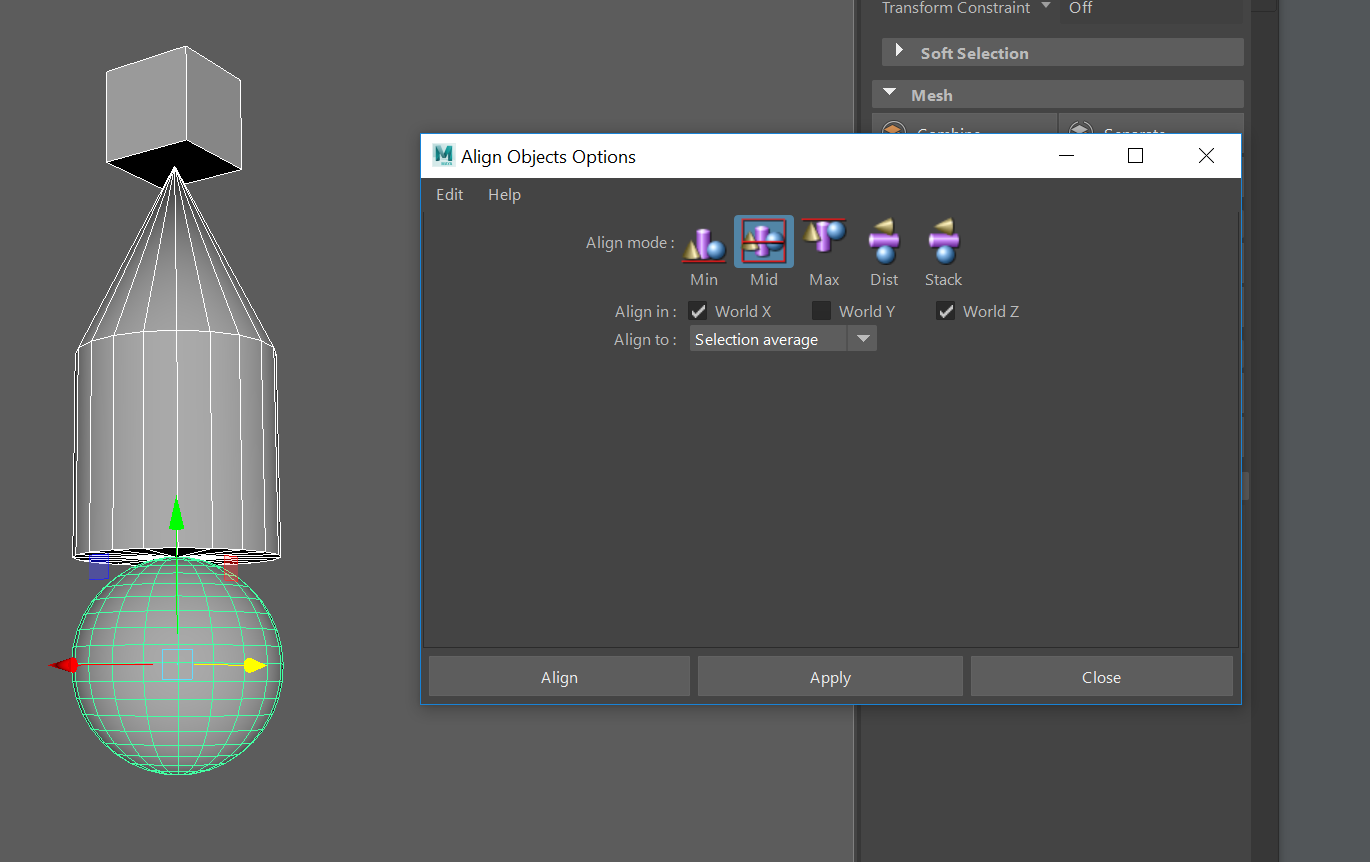
Alignment:
Here I will create four objects and align them together using the snap align objects tool. This was quite tricky to do, but after lots of clicking and switching between the Z and X axis I finally managed to get the four objects aligned. This is useful for getting an object to move to a very specific point above another object, right down to the pixel.


Comments
Post a Comment