#13 - Assignment Models - Jedi Starfighter 2
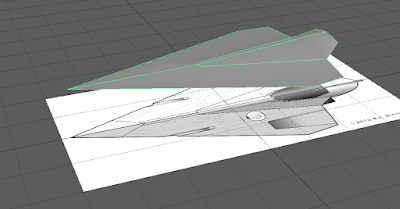
To make it easier to get the exact shape of the Jedi star-fighter I imported a template image showing the top angle what it should look like.
I scaled the image to cover eight units across and then pulled the front vertex on the model forward (to the left of the screen). As for the length of the model, I had some issues getting the vertices to move without pulling the rest of the model across, and it was distorting the symmetry. I spent some time trying to move them around until they matched, but when one side was fine, pulling a vertex on the other side would set it effectively set it back to square one. I finally realised the problem was that I was not using soft selection. I enabled this, then was able to pull a vertex without it pulling the other vertices down with it. Now the shape of the model from the top view was perfect. I then used the multi-cut tool to add edges between the back of the ship and the middle, where the cockpit arches upwards. I pulled the edge in the middle -front of the model upwards, and pulled the new edges for the cockpit down until it looked the right shape and balance. There is now a cockpit shape arching upwards towards the back. In a way, some of the processes outlined in the part 1 blog of this model were obsolete, as I spent a long time trying to perfect the dimensions when I simply went and updated them here using the template, which also made it much easier to position the new vertices used to add edges to the back of the ship.


 |
| https://bj-o23.deviantart.com/art/Jedi-Starfighter-template-185786070 |
I scaled the image to cover eight units across and then pulled the front vertex on the model forward (to the left of the screen). As for the length of the model, I had some issues getting the vertices to move without pulling the rest of the model across, and it was distorting the symmetry. I spent some time trying to move them around until they matched, but when one side was fine, pulling a vertex on the other side would set it effectively set it back to square one. I finally realised the problem was that I was not using soft selection. I enabled this, then was able to pull a vertex without it pulling the other vertices down with it. Now the shape of the model from the top view was perfect. I then used the multi-cut tool to add edges between the back of the ship and the middle, where the cockpit arches upwards. I pulled the edge in the middle -front of the model upwards, and pulled the new edges for the cockpit down until it looked the right shape and balance. There is now a cockpit shape arching upwards towards the back. In a way, some of the processes outlined in the part 1 blog of this model were obsolete, as I spent a long time trying to perfect the dimensions when I simply went and updated them here using the template, which also made it much easier to position the new vertices used to add edges to the back of the ship.

Next, I added in another image to the Z-axis view, the side of the ship. This template is slightly different from the one representing the top of the ship, so I will use this one as the main image as you can see more detail in general.
 |
| https://wingzero-01-custom.deviantart.com/art/Delta-7B-Aethersprite-Jedi-Interceptor-Line-Art-560267320 |
I noticed that the edges of the sides of the ship have a slight thickness to them, so I selected the bottom face on both sides and extruded them down, creating this thickness on my model. The gap that you can see running down the middle of the ship was fixed by using the target weld tool to merge the two edges together, before pulling the remaining edge slightly back in to the middle.

Then, using this image, I selected the appropriate edges on one side of the ship, and pulled them all down together to form the downwards-pointing angle the side has in the reference image, then did the same on the other. Unfortunately this took far longer than it could have, because I had tried to cut the curve shape near the front of the ship (seen from the top-view) where the laser gun is, and this left the edge with lots of unwanted vertices, causing a bend where the movement would stop. Eventually I managed to remove the gap and flatten the edge properly, and the two sides of the ship were even again. I now know always to get the shape of the body of a model done before attempting to add attachments, as it can cause much difficulty if you need to go back and alter things.

This time, the shape of the body of the star-fighter is more or less done. Any changes shouldn't be too difficult to make but for now it should be fine.


Comments
Post a Comment