Posts

#61 - Animation - Background

Image
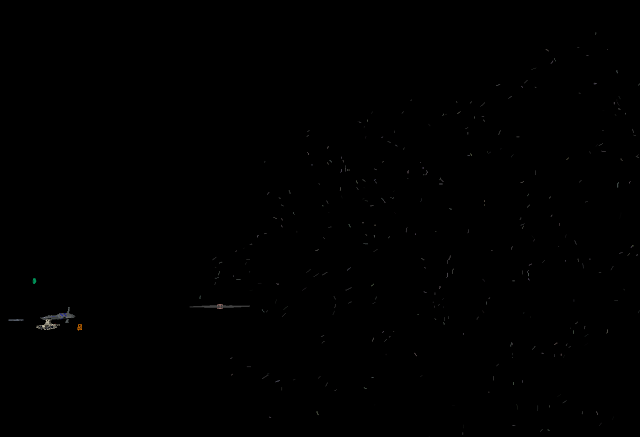
I have finally found a solution for my background issue. I have used the space dome and applied a texture. The first texture I tried would not appear on the model for some reason. The second texture however, which was sent to me by fellow student Josh Olsen, works perfectly. Reference to Josh for providing me with the image, which he found on Google and modified to suit the sphere shape. Now that the texture is on, it significantly improves the whole feel and atmosphere of the animation. By applying one texture the whole things feels much more complete and professional, although obviously it still has its issues. The texture resolution is good, and sufficient for this animation, but not perfect. The main thing is that now the animation looks like a proper animation with some effort put into it. I now need to add some more lights to make the models properly visible against the black background. I improved the texture even more later on by selecting the object, going to UV and choos...

#60 - Animation - Scene 6 - 8 Motion

Image
I will now describe how I animated the movement for the ships and camera through scenes 6, 7, and 8. A post for scenes 4 and 5 were not necessary because it is essentially just the camera moving towards the hangar and staying still; the two ships currently in the scene don't move after that. Scene 6 is where the camera has an extreme close up shot  of the Jedi Star Fighter, designed to avert the viewer's attention from all of the action and carnage of the EMP blast and focus on the main plot element. The camera rises up slowly for a couple of seconds while the star fighter performs its motion into the exposed hangar. The star fighter itself does not use a motion path. Firstly, to get it in the scene in the first place I made the scale 0 on every dimension until the frame when it is supposed to appear, and the viewer is none the wiser as it appears in time for the camera shot. When it does appear, it is quite small compared to the Invisible Hand, which is why an extreme clo...

#59 - Animation - Engine Textures

Image
I had a lot of trouble with the particles when trying to make the engine flares, and frankly it looked terrible. I then realised that actually, why use particles at all when in Star Wars the engines just have a bright glow coming out of them, rather than a flame? So I deleted the particles and created a new texture with maximum glow on it, and the effect that resulted was perfect. I its so much easier to make, looks far better, and is easier on the render time. I added this texture to the engines on the Venator and the Invisible Hand and the glow looks very realistic. After the pain and effort that was a failed attempt to create an engine flare, I am very happy with how the engines now look. What is really nice about them is that there is a whole shot where you can see the whole back of the Venator, providing a great view of what might be the most realistic part of the entire animation. This significantly improves the whole effect that the specific camera angle was intended to cre...

#58 - Animation - Camera Angles

Image
I would like to talk about the camera angles I have used throughout my animation, now that I have reached the thirty second limit (at least unless I edit the timings). I am confident that the animation follows the camera angles and timings written in the storyboard, which contains eight separate scenes. The beginning of the animation certainly matches the storyboard. It consists of a close-up shot  of the Invisible Hand, which moves beneath the camera like a shark. The close up shot is used to give a sense of scale, and show how big, and how dangerous the ship is. The viewer should realise that the Invisible Hand is the antagonist right away. The seconds scene follows on quite nicely with a long-shot  of the Venator Destroyer closing in on the Invisible Hand, preparing to fire the EMP. The distance from the camera reinforces the scale of the whole space being used for the scene. Obviously the ships are quite big, and it is a large scale attack over a wide area in sp...

#57 - Animation - Engine Particles

Image
Creating these particles was a long and painful process. I had to try many different techniques before I achieved something that worked in the renderer. In fact I can't remember them all, but I spent a long time finding tutorials that actually showed me how to use particles instead of fluids, then these tutorials would be rubbish anyway. It took forever to get the particles to be textured in some way. I first created an emitter and set it to have a volume emitter type with a cloud particle render type. I used the parent constraint tool to attach it to the Venator and luckily this time it worked. I added a dynamic colour attribute and set RGB values to 50, 20, 225 to create a bluish flame colour. The colour was fine, and it renders in Maya Software (but not Maya Hardware), but clearly the flame cloud is too big. To fix this, I set the emitter type to directional and reduced the lifespan and the radius of the particles. It is not a perfect flame shape, but it looks close enoug...

#56 - Animation - Background

Image
Because I could not find a high enough resolution texture for my space dome, I decided to try and paint the background on to the whole scene. I used the paint effects panel in Maya to paint a preset galactic texture onto the sky box in the scene. I also set the background colour to black, so that only the stars would be the difference in the the texture, rather than having grey blobs and black blobs. This is a very difficult and time consuming method of setting a background, because you have to be very careful where you position your camera and mouse in the paint panel, as you could end up painting the area directly in front of you rather than behind an object for example. It is also a very render-heavy method; I've noticed straight away the the render time is much longer than before. If it takes too long I might have to remove it and find another way to texture the space dome, as originally planned. This would be a shame because the galactic paint looks really, really nice when us...

#55 - Animation - Hangar Shields

Image
To create the hangar shield I added a cube prefab and scaled it to be the size of the hangar space. I then added a new Lambert to it, set the transparency to high, put on a blue tint and increased the glow. I had the same problem I had with the debris when I tried to constrain the hangar shield objects to the Invisible Hand. Like the debris objects, I have got the shields constrained from frame 195 on wards, and they do not move with the parent model before that. Conveniently, the hangar shields are also not visible until frame 420 as well, so for the purposes of the animation their current movement is fine. I also had a problem where it would move the hangar shields back for some reason and not cover the whole space, but I fixed this by scaling them up, setting a key frame and luckily they still did not poke out the back of the model. The hangar shields were quite easy to make, and they look very nice when rendered. There may be a need to improve the texture later on,...